Foraging Tools
Let’s face it. More people will do more things with wild foods if they are having more fun and experiencing less drudgery. If you have to spend half an hour cleaning some part of a plant, only rewarded with tiny pieces of food the size of a thimble, your enthusiasm will go the way of the dinosaur. Any harvest will be easier, less dirt prone, and more productive if accompanied by the right tools. In this chapter, I discuss the tools I use and how I carry them. In addition, this chapter offers concepts involved in food gathering that will help you be more successful.
Different sets of tools and tactics are required for different situations, such as harvesting from trees, shrubs, or vines, and collecting in complicated environments like marshes or the seashore. The tools I’m referring to here are perfect for gathering the wild foods discussed in this book.
Tools are most efficiently and effectively used when they are easily accessible. How do you carry all this stuff around with you? We can all take a lesson from Batman, the comic book hero who is much more effective because of his utility belt. That belt is packed with tools/devices that give him diverse capabilities and advantages over other crime fighters. Modern-day workers have utility belts—police and carpenters, for instance. The handier their tools, the more productive they are. Each of the tools discussed in this chapter have a place on the forager’s utility belt.
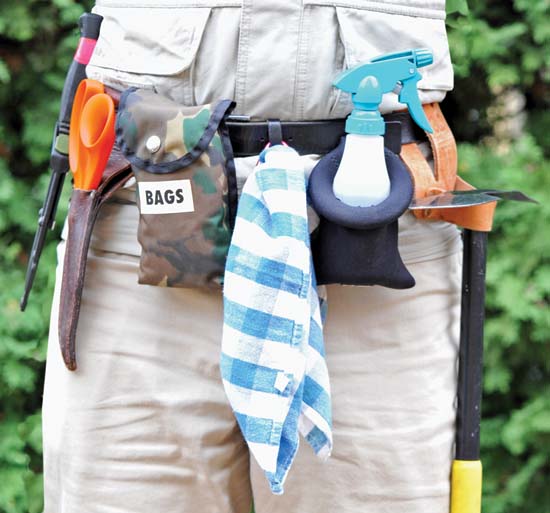
My fully loaded, wild food utility belt. Left to right: knife, scissors, bag holder, rag, spray mister, and spade-pick. It is not necessary to carry all these tools all the time—just carry what you need to suit the plants you plan to gather.
The simplest tools you can use are your hands, of course. You can always grab a bunch of plant matter and pull it free from the plant. You can dig with your hands, pinch leaves free with your fingers, and wrap your harvest in that extra shirt or jacket you have with you for transport. Gathering without tools involves pinching, snap-breaking, and jerking parts from the growing plants.
The benefit of this strategy is that you do not have to carry around any tools. The problems, however, can be many—depending on the plants you are gathering and how far you are traveling prior to food preparation. Problems encountered are mostly food-quality issues. If you eat the plants as you pick them rather than transporting them, you have less to worry about. The more you pinch, jerk, and pull plant parts during a harvest, the more you bruise and damage them. Damaged food is harder to clean, has a much shorter shelf life, and does not present as well as it could. And if your hands are dirty (not uncommon while foraging), you grind that dirt right into the plant, making it harder to clean.
What follows are suggested tools to try and the sheaths that hold them. Sheaths are specially designed pockets, often attached to a belt, for holding a tool that hangs off the body; knives are held in sheaths.
Belt
I use three systems, depending on how flexible I need things to be and how many tools I want to take with me—no tool belt, my pants belt, or my utility belt.
In those circumstances where I am on a simple gather in my backyard, I’ll just carry the scissors and bags in my hand. A belt is not involved.
On other occasions, I might take scissors, a digging tool, and bags, and loop their sheaths directly to my pants belt. While this may seem like the most efficient way to mount your sheaths, they are stiff solid objects that can restrict movement around your waist. You might have to remove them when getting into cars or sitting on a chair. Threading sheaths on and off your pants belt while simultaneously threading that belt through your pants loops gets a little tedious after a while. Due to this inconvenience, I mostly use a dedicated utility belt.
A dedicated utility belt is strictly for holding the sheathed tools, not for holding up my pants. I can remove it easily and quickly since it rests on top of everything. If I am wearing a coat, a utility belt can easily wrap around the outside of it. That coat would bury/cover/restrict access to tools threaded on a regular belt.
To avoid clutter around your waist, take only the tools you think you will need for the foods you intend to gather.
Scissors
A sharp pair of scissors is probably your most valuable tool. I carry scissors with me whenever I go foraging. If I could only have one tool for the kinds of plants in this book, a pair of scissors would be my choice.
The usefulness of scissors will become apparent once you start using them in the field. Two blades singlehandedly trap what you are cutting, providing their own counterforce and shearing action. Cutting plant parts is simple and precise. Even dull scissors will cut much better than a dull knife. And when the scissors are sharp, they cut through plant matter like butter. A clean cut provides less damage than a jagged edge caused by just pulling with your hands alone, helping to give the plant a longer shelf life.
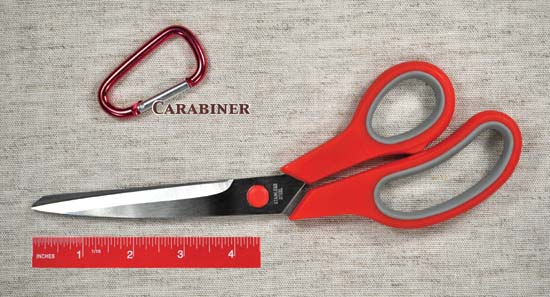
Measuring scissor size. The most useful kind of scissors has a cutting blade that is 4 to 5 inches long from the pivot screw to the tip of the blade. It is helpful to have red or orange markings somewhere on the handle, making it less likely to forget them on the ground as you walk away. Also shown is a carabiner, which is one of many possible ways of attaching a rag to a utility belt.
Scissors are especially useful because they enable mass harvesting of low-to-the-ground, densely growing plants like chickweed. When chickweed is growing in dense mats, you simply grab a handful of the tips, slide your scissors blades below your hand, and snip. You now have a salad in hand that is ready to eat. Try that with a knife, or by pulling or plucking, and you will know immediately the value of the scissors.
In addition to this salad-harvesting technique, cutting stems is a breeze. It’s easy, whether you are cutting a tender leafy stem near the top of a plant or cutting whole stems for later leaf extraction.
My favorite pair of scissors has a blade that is almost five inches long, as measured from the hinge screw to the tip of the blade. Ignore the advertised length and measure the blade yourself. A blade of that size is about as big as you can get without special ordering or finding a great hardware or fabric store. And while small scissors are better than none, you will be more productive with a blade that is long. The best selection is found in large craft, specialty hardware, or fabric stores. Some stores are now selling titanium-bladed scissors for extra durability.
Look for heavy-duty scissors with thick, sturdy, stainless steel blades. The cheaper ones have thin bendable blades and brittle plastic handles that will break with outdoor use. If you think that you are paying too much for good scissors, compare the price to what you would pay for a good knife. Good scissors are inexpensive for what you get.
It is also helpful for the handles to have some bright orange or red coloration. You are less likely to accidentally leave them somewhere if you can clearly see that they do not blend in with the mostly green and brown habitat you are harvesting from. It is also not a bad idea to get a scissors sharpener to maintain your blades.
Sheathe your scissors! Carrying scissors in your fanny pack or backpack can work, but the more you have to dig for your tools, the less enjoyable the experience.
I use a knife sheath to hold my scissors. It sits on my belt right next to my knife in its own sheath. That way it is immediately accessible. I call this a scissors sheath. I have yet to find a good scissors sheath on the market, so using a knife sheath is the best alternative. Make sure the sheath is deep enough so that the scissors fits in snugly—you don’t want it to pop out accidentally.
Hand Rag
Invariably, your hands will get grimy with soil while harvesting. I do not want that grime on my harvest. This is true whether I am snacking on the spot or if I am gathering for later use. To solve this problem, I like to have a dry absorbent rag handy. Once your hands get dirty, just grab the rag and wipe off the excess. This is not to thoroughly clean your hands; it is intended to get annoying, food-contaminating dirt off them. The rag will get dirty as you use it. Under many circumstances, it will continue to work even when dirty. It is wise to have extra clean rags handy to replace ones getting too dirty.
You have the choice of putting this rag in your pocket and pulling it out as needed, or making it a member of your utility belt. I prefer it being on the belt because of its instant access. This can be hanging from your belt in any number of ways. The simplest way is to just loop it around your belt where it will fit snugly. I personally use an inexpensive carabiner, which used to be the exclusive domain of mountain climbers. These quick, practical, and useful latching devices are now universally available in many sizes in most hardware stores. I see them most often as parts of key chains.
Fasten the carabiner (or other loop of your choosing) on a belt loop and pull the rag through. The size should be such that the rag fits snugly. You want it snug enough so that it does not slide out while you are working. You want it loose enough so that you can pull it out when you are done or need to replace it.
The only problem with hand rags, particularly if they have a thick weave, is that they can collect bur seeds from tall grass and other plants. To reduce this problem, tuck them into the belt when problem plants surround you or if you are kneeling down toward the dirt.
Portable Digging Tool
For many of us outdoorsy types, it is quite pleasurable to dig with our hands. Most of the time, however, the soil is too hard for this to be practical. Pleasure aside, unless all you are going for is roots, digging with your hands not only makes your hands dirty, it infuriates your manicurist. Dirt easily transfers to the greens you are gathering. Dirty greens then take a lot more work to clean. And while this may seem obvious, harvesting enthusiasm can overpower the patience needed to engage in more practical behavior.
It is good practice when harvesting plants to separate the harvesting of greens and roots. I suggest gathering your greens first, placing them in clean bags, then going back to dig the roots last or on a different trip. They should never be put in the same container unless there is no other option. If you are forced to place them in the same container, try to wrap the greens in something, like some large nearby leaves, to protect them from the dirt. No matter the gathering sequence, most people will still want to wash their greens, even if they appear clean. The process, however, will be easier and faster, and you will use less water if you harvest greens first and bag them separately from soil-attached parts.
If your goal is to harvest wild roots in your backyard, it is easy to just grab a shovel, assuming you own one. But what if you live in an apartment, do not own a shovel, or are foraging away from home? You cannot always carry a garden shovel around with you. You need a portable digging tool. Here are some options:
Shovel: If you know you are going to do some serious shoveling, like digging large burdock roots (Arctium lappa, not covered in this book), just use a regular, heavy-duty, long-handled garden shovel. Any portable digging tool is less practical for roots deeper than a foot. A regular shovel makes sense when you already know where some large-rooted plants are, and you have a harvesting plan. Then make it a special trip focused on gathering that root.
Spade-Pick: It is impractical, however, to carry a full-sized shovel with you whenever you might be in a foraging situation. In lieu of carrying a large shovel, the best portable digging tool I’ve found so far is a small spade-pick. This is a hand trowel with a spade (small shovel) on one side and a pick on the other. Here are the two best options I am familiar with:
My preferred option is a gardener’s spade-pick, which is typically about fourteen inches long. I find this the best combination of size, utility, and portability. These are lightweight but made of very strong welded steel. They are available in many garden sections of big department stores and nurseries. Skip the ones with blades riveted to the handles—they are less durable than the welded ones. The one I use is made by Lewis Tools under the names of TerraTuff, Terra Planter, or Yard Butler. It is strong enough for most applications and yet light enough to carry with you into the field. Use the pick side for hard and/or rocky soil and the spade side for softer soil.
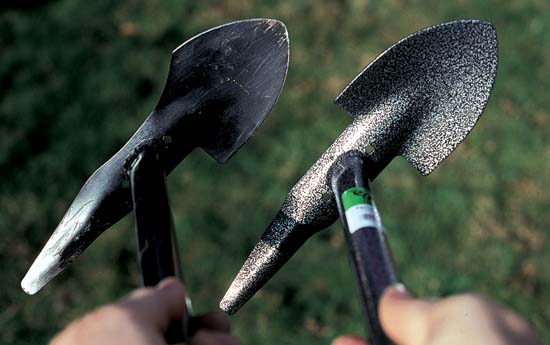
Spade-picks compared. The one on the left was trimmed with a hacksaw to curve around the body when being worn in its sheath. Unshaped, as seen on the right, these tools have a tendency to stab into the side of the body.
A second option is a camper’s mini shovel-pick. This is a folding adjustable multi-position, take-apart gizmo that is similar to the gardener’s spade-pick but gives you folding options that the other one does not. This is not your World War II–style folding shovel. Several manufacturers make almost identical versions of this, including Coghlans, Coleman, and Texsport. These are often available in camping stores. The advantages to this kind of shovel-pick are that it can be folded, placed, and carried inside its carrying pouch so that it is less likely to jab you if you fall; the shovel component can be fixed to a straight position, just like a regular shovel, or at a right angle, just like the gardener’s spade-pick; and it has a certain prestige factor with guys who love gizmos. The disadvantages are that it is shorter and heavier than the gardening tool (giving less leverage in the digging action), and the folding joints get clogged with dirt. Beware of cheap models whose blade attachments are so weak that they bend at the slightest force.
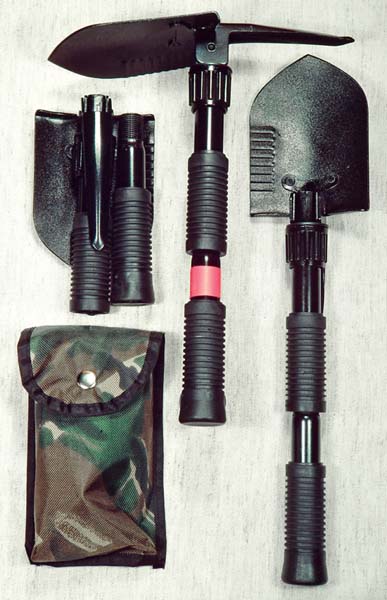
Folding shovel-picks: (left) folded shovel-pick and sheath; (center) assembled shovel-pick positioned for shoveling or picking; (right) assembled shovel-pick positioned for shoveling.
I prefer and use the non-folding gardener’s spade-pick because it is simple and ready to use, is sturdy, and has a reasonable length to feel comfortable while digging. So how does the spade-pick work? It becomes an extension of your arm. Use it like you would a hatchet or a hand ax, only instead of chopping wood, you are chopping into the soil. Unfortunately, due to the shape of this tool, a normal chop splashes dirt toward you. To divert the dirt away from you, learn to chop with your arm slightly angled to the side.
How you carry the spade-pick around with you is a matter of preference. While hiking, you could carry it in a loop on the back of a backpack, much like climbers carry ice picks. But that requires you to remove your pack to retrieve it every time you want to dig. This brings us back to the utility belt idea. The goal is to hang this fourteen-inch-long tool on your belt for convenient access without it getting in the way, hurting, or injuring you. To meet my needs, I’ve modified the spade’s shape so that it does not jab me while attached to the belt. Using a hacksaw, I curved one side to fit the side of my waist. I then sanded the cut edge smooth. (See the spade-pick comparison photo above.) Then I needed a sheath to attach it to my waist and protect my side in case I fell on it. One option that works well is to buy a hammer holder from a hardware store. If you go this route, buy one with a leather loop, not a metal one. Metal clanks against metal, which is annoying, and it does not hold the tool as securely as leather. The hammer holder is made of leather thick enough to prevent the spade-pick head from touching you.
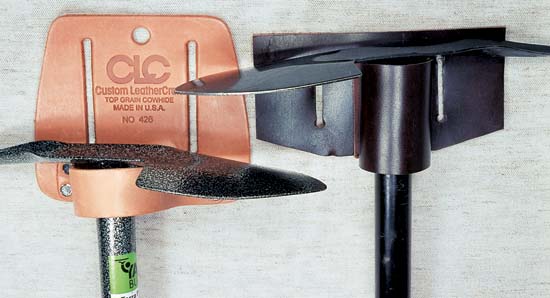
Spade-picks in sheaths. The one on the left is a standard sheath that is designed to hold a hammer (Custom LeatherCraft, Model #426). The spade-pick sheath on the right is one I built myself.
Knife
For the last twenty years, I’ve been using a fixed-blade hunting knife. Fixed-blade knives are solid and do not fold. For my purposes, the benefits of the size, solidity, and harder edge on the better knives greatly outweigh knives that fold.
For the kinds of plants in this book, a knife has few uses aside from hacking stems and woody material that are too large and solid for scissors. Of course, once you’re back in the kitchen, knives play a wonderful food-preparation role. But you have kitchen knives for that. Do I carry my knife when harvesting the plants in this book? Yes, but only because I might find a need for it occasionally. A knife is much more useful for trips into the woods.
Spray Mister
In the produce department of supermarkets, you might hear the muffled sound of thunder. Then, out of nowhere, sprayers kick on in unison, misting the greens until they are drenched. For years I did not like having to deal with all that wetness in my shopping experience. I thought, isn’t there a better way? Do the plants really need to be swimming in all this water?
The answer is YES! Swimming in all that moisture keeps cut greens fresh and alive. Harvested plants wilt because their source of fluid is cut off and because they lose water through their pores (transpiration). Transpiration seems to increase once the stem is cut or when the plant is exposed to sunlight. It’s as if the plant knows it’s doomed and just gives up. Heat above 40 degrees and direct sunlight will speed up the wilting process. Your goal is not only to prevent harvested greens from drying out but also to give them what they need to stay vital.
A spray mister is one part of the solution. Misting keeps plants hydrated directly. Spray misters are found in supermarkets and department stores offering gardening supplies and cosmetics.
As soon as you harvest leaves and stems of a plant, give them a thorough misting right in your collection bag. This not only prevents transpiration, it also hydrates the plant even further—often making your keep crispier and fresher than when it was still attached to the stem. I’ll talk more about maintaining hydration and transporting the greens in the following discussions on bags and water trays.
Spray misters do not come with sheaths. The best sheathe option I’ve found is something called a “Catch-All” made by Case Logic. It’s located in the automotive section of department stores and is intended as a universal holder in your car for cell phones and other odds and ends. It’s too small to hold a cup or glass but is good for that small spray mister. It’s made of neoprene, which stretches to firmly hold that spray mister. Since a Catch-All is not designed for the rigors of fieldwork, the upper rim can unravel somewhat. This is easily fixed with a needle and thread.
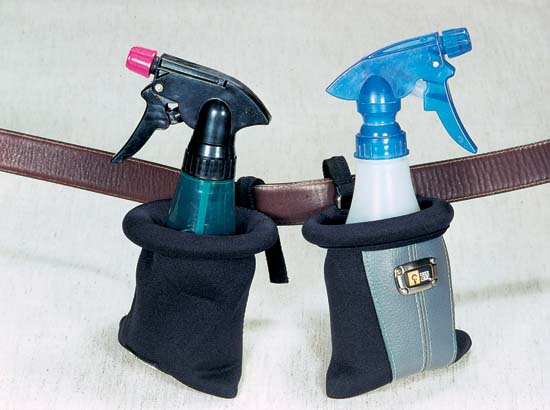
Spray misters in belted Catch-Alls. The Catch-All on the left comes with a hook-over-the-belt arrangement. I bent the hook on the Catch-All on the right to circle and fit more snugly on the belt. The shaped hook does not fall off the belt as you move around.
Collecting Bags
Unless you are eating all your wild foods as you pick them, you will need a harvesting strategy, your goal being to keep the pickin’s fresh and vital until you get them into more controlled conditions. This is true, even when gathering right out your backdoor, since the sun can bake and wilt your greens in minutes. Heat, sunlight, and dryness are the enemies of fresh produce.
For transporting greens, I recommend reusing those ubiquitous white plastic grocery bags. Plastic maintains moisture, white reflects the heat of the sun, and these bags have built-in handles. Do not use clear or darkly colored plastic bags, particularly on bright-to-sunny days. The sun’s rays will go through and get trapped within clear plastic, wilting/cooking the greens. The darker the color of a bag, the more that color will absorb the heat of the sun. If you have a choice, a white bag is your best bet. White double bagging is even better.
I carry my empty bags tightly packed in a pouch on my utility belt for easy access. A small pouch can carry around twelve bags—plenty for most circumstances. Spray-mist the contents of the bag on regular intervals as it is being filled. Once you have loosely filled the bags with plant material, keep the contents cool and moist. Keep your collecting bag in the shade whenever possible, even in your own body’s shade, in the partial shade of a nearby plant, or in your backpack.
If you prefer to use woven bags or baskets made of natural materials, keep them covered with a wet white towel. Spraying a porous container itself will result in some evaporative cooling. If you have a distance to travel, make sure the contents stay cool, moist, and shaded.
Water Trays
Another collecting option is to use water trays. I use the plastic storage containers you find in housewares departments. What I’m calling trays are often called tubs, bins, or storage containers. If you can find white ones to reflect sunlight, that is great, but I can only find semitransparent ones with white tops. Unlike bags and baskets, these trays can hold standing water. That water keeps your harvest hydrated through the stem as well as from your spray mister. The solid structure helps to prevent plants from getting crushed and damaged.
For this to work, the tray’s bottom should be filled with cold water. As you collect your leaves, stems, or shoots, stand them in the water, loosely packed against each other. Their cut end is in the water and their tips are up. Spray-mist these to keep the tops moist. When you are done harvesting or if the tray is full, cover it to keep in the moisture and to shield it from the sun. As always, keep it in the shade if you can. If your take is too tall to use its lid, cover it with a white plastic bag and keep it out of the sun.
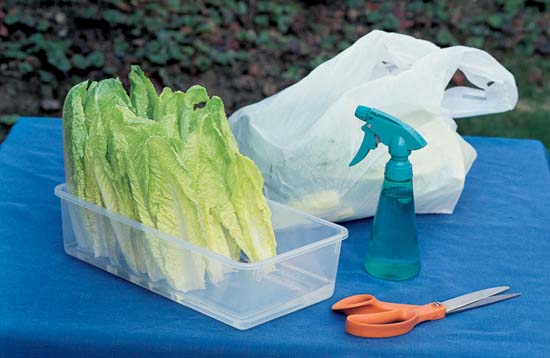
Plant-collecting containers. Water trays and recycled white plastic bags are convenient and keep your greens fresh. Natural material containers (baskets, cloth bags) work great as long as you use techniques to keep your take moist, cool, uncrushed, and out of the sun.