Mallow
One of the most diverse and useful plants
Family: Malvaceae
Species: Malva neglecta
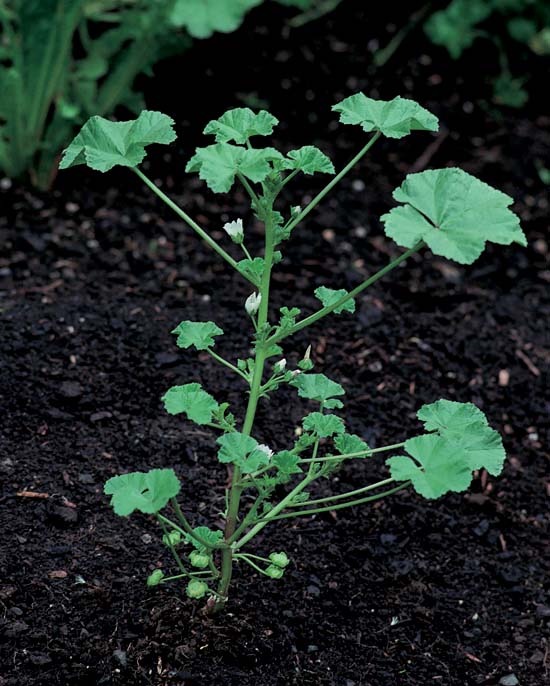
A young mallow plant, about 10 inches tall, showing all of its parts: leaves, stems, buds, flowers, and fruits.
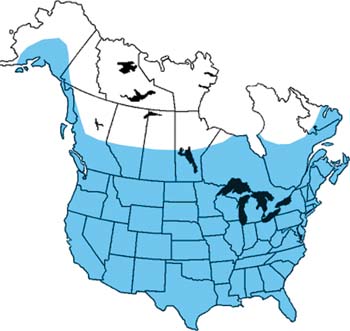
Estimated Range
Official Species Name:
Malva neglecta Wallr.
Synonyms (Historical Names):
Malva rotundifolia auct. non L.
Malva pusilla Sm.
Malva pusilla auct. non Sm.
Common Names:
Mallow
Common mallow
Cheeseweed
Cheese plant
Buttonweed
Dwarf mallow
Roundleaf mallow
Not every time you see Malva rotundifolia in field guides will it really be the same plant as Malva neglecta. There are two Malva rotundifolias. The one listed above with “auct. Non L.” after it is Malva neglecta. The other one, Malva rotundifolia “L.”, known as low mallow, is the real Malva rotundifolia—a brother of Malva neglecta. Sometimes the two plants will not be distinguished by their endings—so you will not know which is being referred to. But they will have the same food uses.
An herbaceous weed naturalized from Europe, mallow is widespread and abundant in North America, primarily where humans have inhabited the area and where soil has been disturbed.
Edible Parts:
Young leaves
Flowers
Green fruits
Brown seeds
Mallows were fascinating to me the very first time I discovered the little fruits, just hanging there for me to pluck and eat—an easy, great-tasting, and convenient fast food.
Common mallow (Malva neglecta) is not your ordinary wild food. It’s specialness, however, is often overshadowed by its famous European cousin, the marsh mallow (Althaea officinalis). The common mallow is much more abundant in North America than the often domesticated marsh mallow.
Mallow is one of my favorite plants, and it may well be one of yours in short time. Not only does it provide food, it’s also lots of fun to experiment with. The kinds of foods it can become are diverse and numerous. Aside from being a regular vegetable green, most parts of the plant contain a thickening agent. With the proper knowledge, one can make excellent greens, soups, stews, gumbos, meringues, and mallowmallows from this plant and its close relatives.
Many members of the mallow family are native to Europe, Eurasia, and North Africa. The most weedy species, the one we are interested in here, has spread across North America. That plant, known as common mallow, is the focus of this chapter.
Malva parviflora (small-flowered mallow) and Malva rotundifolia L. (low mallow) are widespread and similar in appearance to, but not as common as, common mallow. And, while their properties and edibility appear to be similar to common mallow, I have not found them in enough abundance to experiment with. These two mallows can be easily distinguished from common mallow. Common mallow has flower petals that are more than twice as long as the surrounding calyx. In contrast, small-flowered and round-leafed mallows have flower petals only slightly longer than their calyx.
The term malva originates from Greek, meaning soothing, softening, and generally pleasant to the skin. These characteristics describe the emollient properties of mallow. Common names include mallow, common mallow, and cheeseweed.
“Cheesewood” was inspired by the shape of the fruits, which resemble miniature cheese rounds. Mallow does not have a cheesy flavor or color. From here on, I will refer to common mallow (Malva neglecta) as just “mallow.”
Mallow is a hardy plant that is a little more habitat-tolerant than many of our wild vegetables. It is abundant in most inhabited areas of North America as well as on farmland. Once you learn to identify it, you will begin to see it all over yards, neighborhoods, disturbed areas, in the cracks of sidewalks, and at home-building sites.
One of the things that makes mallow so hardy is that it grows not only in freshly disturbed ground but also in harder soil that has been softened temporarily by spring moisture. So it is more adventurous than many of the other plants in this book.
Mallow may be an annual, but I have seen the roots overwinter to continue into a second season in the mild Pacific Northwest climate.
I cannot find any reportable information on the nutrient composition of mallow, its phytochemical and antioxidant characteristics. This is surprising considering the worldwide use of this plant. I have no doubt that mallow is wholesome. The fact that it has mucilaginous properties probably bodes well for its potential as a low-glycemic food. But this all has to be studied before we can say anything for sure. Most research in this genus has been done on Malva sylvestris (high mallow).
Several sources warn that there is a laxative effect from eating mallows. The mucilage is made of mucopolysaccharides—probably serving as fiber. There have been no documented cases that I can find of mallow causing any health problems for humans. I eat plenty of mallow and have experienced no unusual laxative effects. There is no known risk to the general public. These mucopolysaccharides and other complex carbohydrates are good for digestion and elimination. The mucilage is a skin and digestive soothant. Mallows, in general, have been used for many purposes related to treating inflammation and irritation.
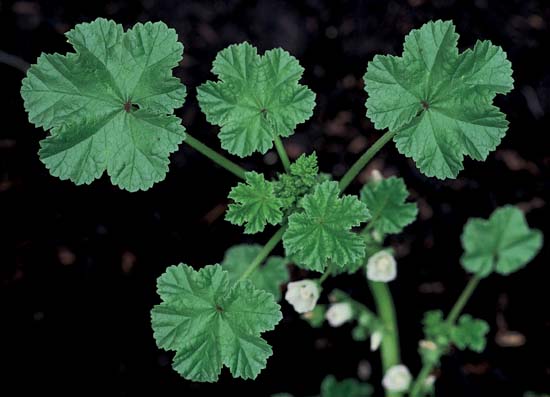
Top view of a mallow plant growing upright. Flowers are blooming lower on the stem.
Knowing Mallow
Mallow can take various forms depending on its habitat and life history. It can crawl along the ground or grow upright. In poor growing conditions, the leaves can be as small as half an inch in diameter. In good conditions, the leaves can be larger than two inches in diameter.
Sprouts: Assuming the seeds are already in the soil, and they often are, the young sprouts come up any time you turn over the soil from May through September. Knowing them at this early stage is helpful for garden management. Pull things you don’t know or want, and keep just enough mallow sprouts to satisfy your needs.
The sprouts are distinctive. The first two leaves (cotyledons) that arise from the seed are heart-shaped. The third leaf to appear is the first that is mallow-like—rounded with a toothed margin. As the plant grows, a stem develops. That stem can branch, grow upright, or trail along the ground. The stems are round and sturdy but typically do not get much larger than 1/4 inch in diameter.
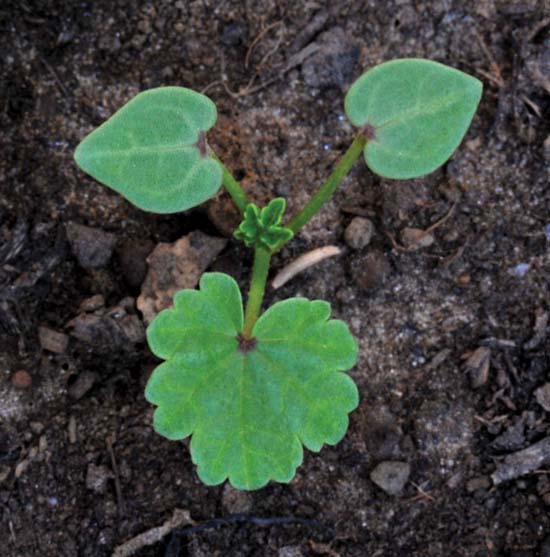
A mallow seedling. At this early stage, there are two heart-shaped embryonic leaves (cotyledons) and one tiny adult-shaped leaf. It is about 1/2 inch from left to right tip.
Leaves: The overall shape of the leaves is roundish. Close inspection shows them to be lobed, somewhat wavy, and covered with tiny hairs. Some plants have leaves that tend more toward being egg-shaped and pointed rather than round, but the appearance is still mallowish. Mallow has long leaf stems (petioles) relative to the size of the leaves.
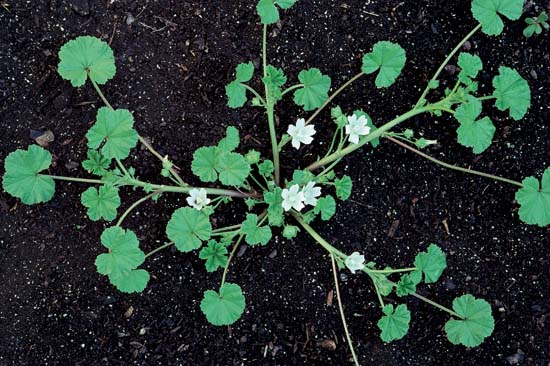
Common mallow plant with reclining stems. This is shown at about 1/4 its actual size.
Flowers: The pinkish-to-white flowers look like miniature versions of its hollyhock and marsh mallow cousins. Most of the white versions have reddish-to-pink veins running through their petals. The petals are notched on their ends. The pistil and stamens in the center of the flower cluster together to simulate a water fountain look.
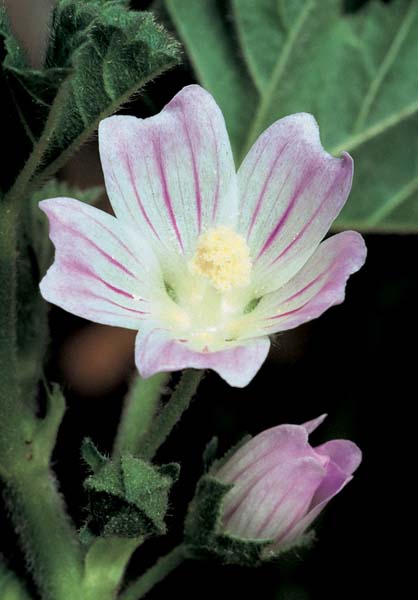
Mallow flower in full bloom. The flower is shown at about twice its actual size.
Fruits: I call them mallow peas. The fruits are small and green flattened vegetables, about 1/4 to 3/8 inch in diameter. Hmmm . . . fruits are vegetables? Well, botanically, mallow peas are fruits. We live in a culture that considers fruits that are not sweet to be vegetables. Peas are a reasonable analogy to use here for mallow fruits if you can ignore the fact that mallows have nothing to do with the pea family.
As I’ve said, the shape of these fruits resembles a tiny cheese round. They also look like tiny tractor tires—a less-appetizing image. These peas are covered with tiny hairs only apparent through a magnifying lens. The sepals are fused into a united calyx, and they surround and curve up over the fruit. Under the sepals are three inconspicuous narrow green bracts.
The edible parts of mallow include the leaves, flowers, and fruits. Mallow produces the most fruit from June through September. Let’s look at these items one by one and then discuss the remaining parts of the plant.
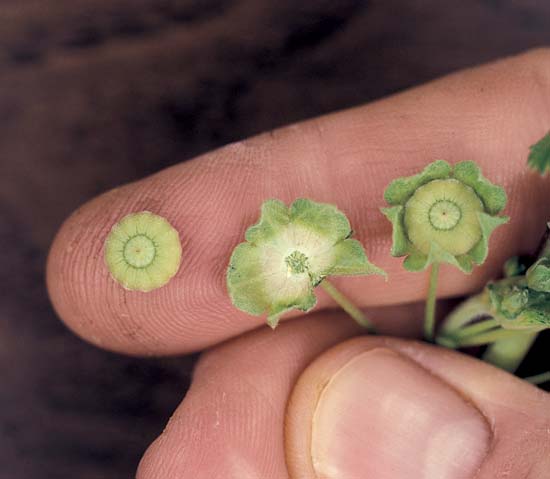
Mallow pea and its surrounding calyx: mallow pea (left), calyx (center), and pea still in its calyx. A calyx refers to the sepals considered as a group. This group of sepals is united into a single structure that encases the fruit.
Mallow Greens: Tender young mallow leaves are edible raw and cooked. They have a mild typical green-leafy flavor. Raw, they are best mixed with other greens and added to salads and sandwiches. Because of their mild flavor, they can be used anywhere that lettuce is appropriate. They are not bitter, pungent, sour, sweet, or strange-flavored. They have no aftertaste.
There are two strategies for gathering the leaves. Gather directly into a salad bowl with other wild greens for a single serving, rinse, apply salad dressing, and eat. Or you can gather in quantity for a family meal or potluck, which takes a little more care because of the tendency for the leaves to wilt.
For immediate use, grab the leaf blade and pluck it, retaining only about a 1/2 inch of the long leaf stem, most of which is fibrous and not worth eating raw. Snipping with a pair of scissors is preferable to plucking. Just hold your salad bowl under the leaf, and the leaf falls into your salad.
If you are constructing a salad for later, you will need to “crisp” the leaves (hydrate them) or they will wilt. Drop the leaves directly into a container of clean cold water. After about 15 minutes, drain the water, place the leaves in a plastic bag, and refrigerate. Use as soon as possible for best quality. They will last in the fridge for several days.
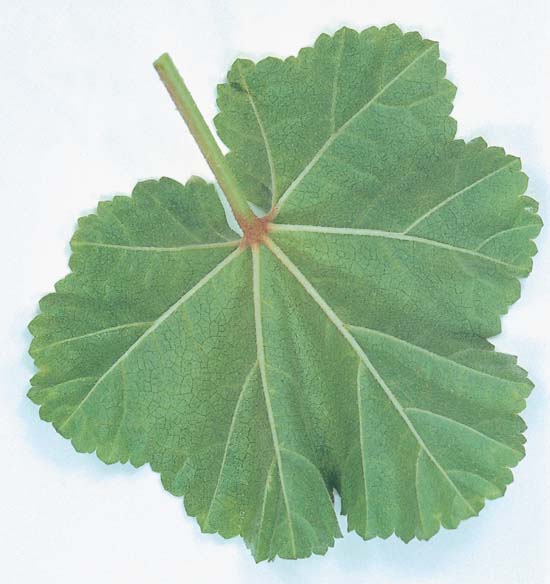
How much leaf stem to keep. Here is the underside of a mallow leaf connected to 1/2 inch of the leaf stem. The physical shape of this leaf plus short-leaf-stem combination is what can be used to help keep salads more airy and three-dimensional. For sandwiches and other uses, this short stem can be left on or off. Never include more than 1/2 inch of leaf stem, as it is too tough to chew.
There are two practical considerations that will affect mallow leaf use for modern society. First, the leaves are small, delicate, and relatively flat. This means that they will not take up much air space in a salad. Most conventional salads have lots of air because of the irregular shape of their ingredients. Leaving the 1/2 inch of leaf stem produces a three-dimensional quality, making a lighter, more airy salad—more like people are used to.
Second, mallow leaves, while tasty, are covered with tiny hairs that you might not notice without close inspection. This affects texture, or “mouth feel,” when savoring the raw unadorned leaves. This texture might be annoying to a person with delicate sensibilities. But, fear not, in a mixed salad or in a sandwich, the hairs go unnoticed. Great wild salads can be made of 1/4 to 1/2 mallow leaves.
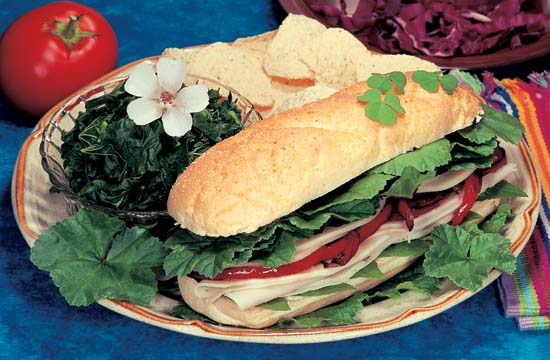
Turkey Sandwich with Cooked Greens. Made with provolone cheese, roasted red peppers, and mallow leaves. Mallow greens in the glass bowl are garnished with a marsh mallow flower (Althaea officinalis). The mucilaginous texture of the cooked greens takes a little getting used to.
Leafy Stems: On younger, early season plants, the upper one to two inches of leafy stem (the growing tips) are also edible and can be used like the leaves. Tenderness is the limiting factor. If you find yourself eating a stringy or fibrous stem, you are either too far down the stem or eating from a plant that is growing too slow from age or lack of water.
Upon boiling, the character of these greens changes. The flavor is fantastic—a smooth-tasting, mellow cooked green emerges. The other change has to do with mucilage that is released from all parts of this plant. This mucilage serves as a thickener for soups, stews, gumbos, vegetable dishes, and meat dishes. In fact, anywhere that okra is suitable, cooked mallow greens can be substituted.
If you grew up eating unadorned cooked okra, you might love boiled mallow greens just as they are. Look up okra recipes in any cookbook and experiment by replacing it with mallow. This is gobs of mucilaginous fun.
If you are not an experienced okra eater but consider yourself adventurous, try eating just the boiled greens with a pinch of salt. You, like many others, may have a difficult time enjoying the thick and slimy texture. Some love it. The flavor is wonderful.
If you taste the cooked greens first and reject them because of the mucilage, do not make the mistake of stopping there. If you do not try them in recipes as an okra substitute, you will be missing out. When used as a thickener, virtually everyone enjoys them.
Flowers: Mallow flowers are edible and beautiful but small with little flavor. Add them to salads or sprinkle them on a dish as a garnish or on cakes for decoration. Make sure you pluck them fresh, just before eating, otherwise they will shrivel before you can enjoy their beauty. Putting them directly in cold water will help keep the flowers open until use.
If you want the flowers for later, you can cut the whole flowering stem and put it in cold water—like you would a long-stem rose. Keep them out of heat and direct sunlight, and store in a cool location. Spray-mist them regularly. Indirect sunlight during the day opens them; they close at night. Cut mallow stems are fickle and sometimes wilt, no matter what you do.
Like other mallows, the flowers can be used to make a flavorful tea. Steep 3 teaspoons of dried leaves or flowers in a 4-ounce cup. This tea is also used medicinally as a soothant for the throat and digestive tract.
Fruits: Mallow peas are great eating, fresh from the plant. Kids love them because they are cute, bite-sized, easily plucked, abundant, nicely flavored, and easy to throw at unsuspecting adults. You can just sit with friends and snack on the fruits of a single, large, well-endowed plant for about twenty minutes before you run out.
Mallow peas are ripe for picking typically from July through September. They are used as a vegetable as long as they are green, no matter their size. They turn brown with age or orange with a spotted plant rust caused by the fungus Puccinia malvacearum.
Collecting the fruits is easy. You can pluck them in their clusters by hand, three or four at a time. You can clear (squeegee) the stems rapidly, then select what you want on an open table. Plucking is best done from fresh plants. About half an hour of these techniques yield about one cup of mallow peas. For efficiency, focus on plucking just the larger fruits.
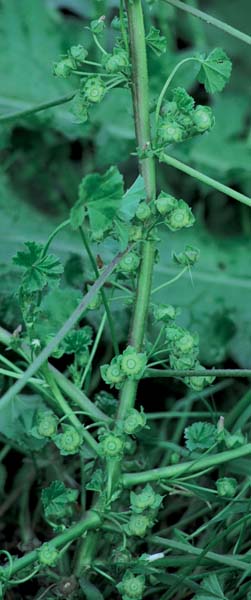
Mallow peas in their clusters of 3 or 4 along a typical stem. This photo is about 1/3 of the plant’s actual size.
To squeegee the stem, grab it with one hand, then slide the other hand along its length, taking everything but the stem itself. Leaves, flowers, and fruits will collect in your hand as you strip the stem. Spread out what you’ve gathered on trays and pick out the fruits one by one. The most beautiful fruits make a wonderful edible garnish for any kind of dish you are presenting. They can be spread on top of salads, soups, cooked greens, meats, pasta dishes—you name it.
Cooked mallow peas produce the same mucilage we talked about earlier. So the fruits will work to thicken soups, stews, and sauces, and will make a great substitute for okra in any kind of meat or seafood gumbo. The fruits can also be used to make meringue and what I call mallowmallows (a version of marshmallows).
Experiment! Everything they are added to will thicken, offering a richer texture. Try mixing them with other vegetables like peas, corn, beans, and the like. Find a creamed corn recipe and use mallow peas in place of the more typical cream or starch thickeners traditionally used. Add them to gravies and meat sauces. There are many wild food adventures to enjoy here.
Sprouts: Fresh green mallow peas eventually mature into dry brown mallow seeds. Seeds can grow into sprouts in nature or in your kitchen. Some people grow foods like alfalfa sprouts by moistening seeds in glass jars. It is likely that mallow seeds could be used for the same purpose.
Roots: Mallow produces one or more ivory-colored taproots. A taproot is one with a carrot-like shape. Mallow taproots are typically thinner and much more fibrous than any carrot you’ll ever buy. I have never found mallow roots useful for eating or processing. By the time they are of usable size, they are tough and fibrous, and do not yield any of the mucilage that could make them useful as a thickener.
Marsh mallow (Althaea officinalis), a better-known relative of common mallow, is appreciated for its roots. The mucilaginous roots are used as a vegetable and as a thickener. Marsh mallow roots were the original ingredient for the marshmallow confection. Modern marshmallows are no longer commercially made with marsh mallow root.
Mumbo Gumbo
Authentic gumbo is made with okra. Since mallow is related to and has a mucilage like okra, I could not resist seeing how mallow worked in place of it. Since these mallow creations are not true gumbos, I am calling them “mumbo gumbos.” Mallows are good in their own right, so we should honor their contribution by giving foods containing mallow their own name. This way we can make “authentic” mumbo gumbo.
Modern recipe books rarely use okra anymore, and it would be hard for you to improvise mallow (mumbo) gumbo without some guidance. So I have done some basic experimenting myself and am passing my successes on to you.
As we have discussed, the leaves, stems, and fruits of mallow, like okra, have thickening properties. This mucilaginous nature goes beyond thickeners like wheat flour or cornstarch. Mallow mucilage adds a richness that is difficult to describe.
Mumbo gumbo can be made from mallow leaves and/or fruits, but in the recipes that follow, I’m just going to be using the fruits.
To invent the following recipes, I modified two recipes I found in the book Practical Cookery, published by Kansas State University. I adapted one recipe for gumbo sauce and one for gumbo soup. I changed the original recipes by using olive oil in place of hard fat, mallow fruits in place of okra, and crabmeat in place of crab boil spices. All other changes were minor. The results were superb!
Shrimp Mumbo Gumbo Sauce
During this and the following recipe, the mallow fruits turned golden to dark brown and gave off their great thickening property. The flavor and texture were superb—reminiscent of the best gumbo I’ve had. Due to the dilution factor when the sauce was served over rice, additional salt and pepper were necessary to bring out the flavor. For both recipes, true Cajuns might want to add more spice—ground mustard seed, hot peppers, ground ginger—and some filé powder just before serving. Makes 3 to 4 servings.
Ingredients:
| 1 tablespoon olive oil |
| 1 tablespoon flour |
| 1/2 celery rib, chopped |
| 1/2 green pepper, chopped |
| 1/2 medium onion, chopped |
| 1 clove garlic, minced |
| 3 cups water |
| 1 small tomato, chopped |
| 1/2 cup tomato sauce |
| 1/2 cup mallow peas (or chopped hard-packed greens) |
| 1/2 cup baby shrimp |
| 1/2 cup crabmeat |
| Salt and pepper to taste |
| Filé powder to taste (optional) |
Directions:
Heat olive oil, add flour, and brown until dark. Add celery, green pepper, onion, and garlic. Sauté until tender and onion is translucent. Add water, tomato, tomato sauce, and mallow peas. Bring to a boil for 10 minutes. Add shrimp and crab. Simmer for 1 hour covered. Serve over steamed wild rice. Salt and pepper to taste.
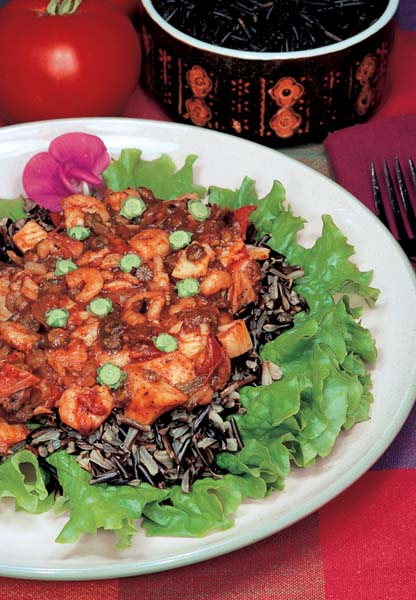
Shrimp Mumbo Gumbo Sauce. Served on a bed of wild rice and leaf lettuce, garnished with a wild sweet pea flower (Lathyrus latifolius), and sprinkled with fresh green mallow peas.
Chicken Mumbo Gumbo Soup
Served with some fresh baked bread, this soup would please even the most persnickety Louisianan. Try it yourself! Add a crab boil during the boiling process for more flavor. Makes 3 hearty or 4 small servings.
Ingredients:
| 1/2 cup mallow peas |
| 2 cups water |
| 2 cups chicken stock (salted stock or bouillon) |
| 1/2 medium onion, chopped |
| 1/2 celery rib, chopped |
| 1/2 green pepper, chopped |
| 2 tablespoons extra virgin olive oil |
| 1/2 cup shredded cooked chicken |
| 1/2 cup chopped tomato |
| Salt and pepper to taste |
Directions:
Boil mallow peas in water and chicken stock for 10 minutes. Separately, sauté the onion, celery, and green pepper in the olive oil until soft and transparent. Add the sautéd vegetables, chicken, and tomato to the pot. Simmer for 15 minutes covered. Salt and pepper to taste.
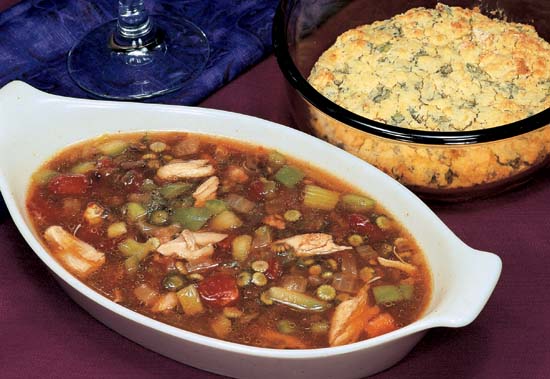
Chicken Mumbo Gumbo Soup. Sprinkled with a few fresh mallow peas and accompanied by mallow pea corn bread.
Mallow Confections
Years ago I read with wide-eyed enthusiasm both Euell Gibbons (Stalking the Healthful Herbs, 1966) and Alan Hall (Wild Food Trailguide, 1973) discussing the idea of making a meringue out of common mallow fruits. Mallow fruit extracts were used in place of marsh mallow root extracts, from which Gibbons had previously made a meringue. Here is the background information:
Euell Gibbons’ book contains a chapter on the marsh mallow plant (Althaea officinalis). While cooking the root of marsh mallow for food, Euell discovered that the water he poured off was a mucilaginous liquid resembling uncooked egg whites. Being the experimenter that he was and with the goal of making an egg-free chiffon pie for a vegetarian friend, Euell found that he could whip the marsh mallow water into a meringue-style froth. That froth was folded into a mayapple/Irish moss fruit gel and poured onto a graham cracker crust. Hmmm—a mayapple chiffon pie. Leave it to Euell to do it with flair.
Later in that chapter, he reports boiling and trying to eat the roots of dwarf mallow (Malva rotundifolia), one of the common mallows. Unlike the marsh mallow root, he found the dwarf mallow root was not an acceptable alternative to marsh mallow root for a vegetable. It was too fibrous, and it did not produce a liquid viscous enough to be useful for whipping into meringue.
Then he tried boiling the mallow peas and came to the following conclusion: “A cupful of these little fruits, boiled in 2 cupfuls of water until the juice was reduced to 1 cupful, yielded a viscous mallow water that seemed almost identical to that prepared from marsh-mallow roots. It would even whip into a stiff froth, like egg whites, and I found I could use this liquid in any preparation that called for mallow water.”
In his book, Alan Hall says the following when referring to common mallow (Malva neglecta) after talking a little about the marsh mallow: “A substitute for marshmallow can be prepared from the roots (not so good) or the fruits (better): cover the root or fruit with water and boil until the level is reduced by half. Cool, then beat the resulting viscous liquid into a froth resembling egg white. When beaten with sugar it is a reasonable field confection or it can be used as a substitute for meringue or whipped cream.”
At first, I misread “A substitute for marshmallow” to mean that Alan has actually made marshmallows. What he meant was that the juice extract of the common mallow could be used in place of the juice extract of the marsh mallow plant to make a meringue or whipping cream. That misinterpretation led me on a 20-year mission to do something that I mistakenly thought had already been done—make a marshmallow (soft, white, fluffy confection that you would use in s’mores) substitute out of common mallow fruits.
Mallow Whites
Mallow whites are created by a process of boiling mallow peas in water. In this boiling, mucilage leaches from the peas, thickening the water. The strained liquid becomes the “mallow whites.”
Selecting Mallow Peas: Mallow peas are surrounded by a set of green sepals and bracts. You can leave them on or take them off. For most people, leaving them on will not make a bit of difference. But, if you are persnickety or if you are a professional chef, then the green parts should probably go. Taking them off takes some extra effort. Roughly follow these suggestions:
| Pluck full peas at about 1 cup per hour. |
| Pluck green-free peas at about 1/4 cup per hour. |
Preparing Mallow Whites: For every ounce of raw “pressed” mallow fruits, use 3 ounces of water. This is a different formula from what Euell had suggested. By “pressed,” I mean to firmly press the mallow peas into the measuring cup to get an accurate measure. You are not mashing here, only pressing to get the air pockets out caused by the sepals and bracts. Green-free peas require no pressing.
Pour the water into a pot that is tall and relatively narrow in diameter. It should be large enough to accommodate the volume of peas and water, with space above to boil. Cover and bring to a rapid boil on high heat.
Remove the cover and add the mallow peas. Leaving the cover off, boil peas vigorously until the total contents reduce by about half. Watch this carefully or the liquid will evaporate and your pan will burn.
As you watch the water boil, you’ll know that it is “thickening” because the speed at which the bubbles emerge will slow down. Test the liquid for proper consistency using the spoon test. Try to extract a spoonful of water. If the water pours off the spoon like water, keep boiling. If the water glops or slips off like it doesn’t want to be in the spoon, you’re done.
Pour the hot contents of the pot through a standard metal kitchen sieve, catching the mallow whites below. “Mild” pressing of the remaining mallow peas is okay if you need more juice. Do not forcefully squeeze the cooked peas for juice or you will get more of a vegetable flavor and fragments of the peas in the juice.
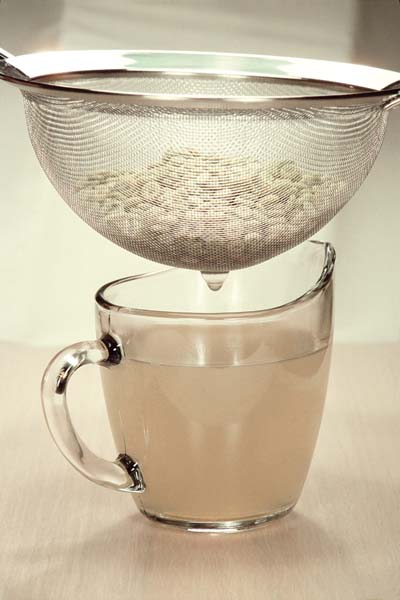
Allow the juice to cool to room temperature before using it in any of the following recipes. Set aside the “spent” peas for later use as a side dish or add them to other foods just as you would add peas. Now that you have mallow whites, you can whip them into mallow foam.
Mallow Foam
Using common mallow, I had little success getting the mallow water from the fruits to whip up into a relatively stable foam—a necessary step for making many confections. I tried making this foam for years with unsatisfactory results.
This is a common problem in the wild food world. One person succeeds in doing something, but you, for some reason, cannot repeat it.
To make whipped mallow, air has to get incorporated into the mallow whites and stay there. The whites are thick, but in my experience, they just don’t hold that air as egg whites do. No matter how thin or thick the juice, little air stays, and the foam flattens back to its liquid form.
I decided to “prime” the foam (get it started) using egg whites. Real egg whites whip up every time. So, using my trusty hand blender, I whipped up one egg white to the soft peak stage. I then blended in some cream of tartar, just as egg white recipes demand, to stabilize the now-aerated whites. Then I slowly began adding mallow whites. Lo and behold, the more I added, the higher the foam got. It kept growing and growing. If mallow whites are thick enough, one ounce has roughly the same foaming power as one ounce of egg whites.
I immediately knew I had something. This foam looked exactly like whipped egg whites. But now it was almost all mallow. Over twenty years of disappointment, and now it was really happening. What a joy, what a thrill!
Having a consistent and “relatively” stable foam opens the door to an unlimited number of uses. Even with the egg white starter, however, the foam from mallow is not as stable as foam made from all egg whites. The solution is to work fast. Once the foam is made, use it quickly—substitute for fresh whipped cream, fold into chiffon pie, bake into a meringue, dry into mallowmallow, or create your own dish with it.
Mallow Whipped Cream
To make a nonfat whipped cream, just follow the recipes for either mallow meringue (uses less sugar) or mallowmallow (uses more sugar along with some maple extract). What makes mallow whipped cream different from the other two products is that you are serving this absolutely fresh, right from the blending bowl. You do not follow up by baking or drying this. This fresh foam is a tasty, nonfat, low-calorie alternative to whipped cream. It is not free of sugar or calories.
Be aware that the mallow white mucilage will begin to separate from the foam within fifteen minutes. For most whipped cream applications, a little seeping is not a big issue. If a little sweet mallow juice seeps below into the strawberries or pumpkin pie, no one will notice. But you cannot leave this out for half an hour or there will be a degradation in the look and consistency of foam.
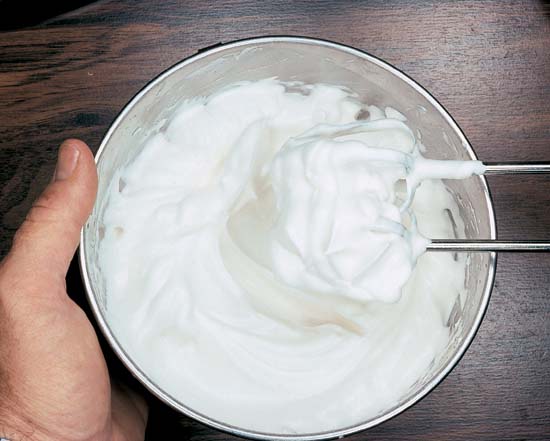
Mallow whites whipped to the stiff peak stage.
Mallow Meringue
Mallow meringue is similar to an egg-based meringue. Taste and texture are so authentic, most people will think they are eating regular meringue. Use mallow meringue in any food that asks for egg-based meringue as an ingredient or a topping—it browns the same as regular meringue. Use mallow meringue to top any pie whose filling holds its shape.
Ingredients:
| 1 egg white (at room temperature) |
| 1/4 teaspoon cream of tartar |
| 1/2 cup mallow whites (at room temperature) |
| 1/2 cup sugar (baker’s or ultra-granulated) |
| 1 teaspoon vanilla extract (or to taste) |
Directions:
Preheat the oven to 325 degrees F.
Whip egg white at high speed with a hand beater until it is at the soft peak stage. Continue whipping through all the following stages until ready for use.
Sprinkle in cream of tartar.
Gradually pour in small amounts of the mallow whites. Pouring too fast will hinder mixing.
Once all the mallow is incorporated, gradually add the sugar, not too fast, about a tablespoon every 30 seconds. Baker’s sugar is best, but regular sugar will work.
Once all the sugar is incorporated (there is no grainy feel between the fingers when you pinch some of the foam), sprinkle in the vanilla extract and continue whipping until foam is stiff but not dry. Total whipping time is longer than for regular meringue.
For pies with precooked contents, spread meringue immediately onto the hot contents, extending it all the way and attaching it to the edges of the baking dish. Bake in the middle of a 325 degree F oven for 20 minutes, or until the meringue has plenty of golden brown areas.
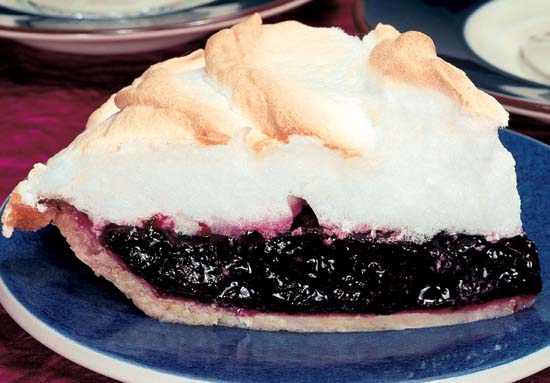
Huckleberry Mallow Meringue Pie
Once I was successful in making mallow meringue, my first instinct was to make a pie with wild fruit. It’s only fitting. So I took some wild mountain huckleberries, cooked them up, poured them into a pie crust and topped them with a huge layer of mallow meringue. I browned it in the oven and marveled at the results.
This is a fantastic pie that everyone will love if you do not eat it all yourself. You will notice lots of tapioca starch (a powder, not beads) in the recipe. This is to firm up the pie. Soft fruit pies will not support the meringue. Tapioca stiffens the fruit and its juice enough to provide that support. If you only have tapioca beads, you can blend or pulverize them into a powder before using. I prefer tapioca to cornstarch or wheat flour as a thickener.
Ingredients:
| 1 egg white, beaten |
| 1 premade regular or graham cracker pie crust |
| 1 cup sugar |
| 6 tablespoons tapioca starch |
| 4 teaspoons lemon juice |
| 1/8 teaspoon salt |
| 5 cups wild huckleberries (also works with blueberries) |
| 1 recipe mallow meringue (see previous recipe) |
Directions:
Preheat oven to 325 degrees F.
Brush egg white onto the pie crust that will come in contact with the filling. This prevents the filling from soaking in.
Stir sugar, tapioca, lemon juice, and salt into a pot containing the huckleberries. Bring to a rapid boil, stirring constantly, then boil for one minute. Pour immediately into the waiting crust.
Apply the meringue to the hot filling immediately. If you are working alone, the meringue will have settled some while you were preparing the filling. If so, whip it again to bring it back to its stiff peaks before applying to the filling.
Place the pie in the oven for 20 minutes. Examine the meringue for proper browning. Remove and let cool. The temptation to eat this immediately is maddening! But you must wait until it cools if you want a perfect result.
Mallowmallow
Mallowmallow is my playful answer to the commercial marshmallow. The original marshmallow was made from the root of the marsh mallow (Althaea officinalis) plant and was gummier than what we enjoy today. But that recipe was retired over 150 years ago when the modern marshmallow, made with cornstarch, corn syrup, and gelatin, came into being. Mallowmallows are made from the fruits of common mallow.
As I experimented over the years, my goal was to design a confection that was, at least, reminiscent of the modern Kraft Jet-Puffed Marshmallow—light, airy, and soft. There were many experiments. Keep in mind that accomplishing in your kitchen what food scientists do in a commercial laboratory requires some imagination and patience.
If you are going to embark on this journey, remember that you are doing this for fun, not because you want to save on the cost of commercial marshmallows! This is something you should do to entertain yourself on a casual summer day. Do it with a friend, a date, your family, or with members of an outdoor group.
Making mallowmallows requires more steps, tools, and techniques than your average wild food. If you do your homework here and become successful at making this, you will be able to wow even your local wild food skeptics.
Ingredients:
| 1 egg white (at room temperature) |
| 1/4 teaspoon cream of tartar |
| 1/2 cup mallow whites (at room temperature) |
| 3/4 cup regular or baker’s sugar (ultra-granulated) |
| 1 teaspoon vanilla extract (or to taste) |
| 1/2 teaspoon maple extract |
Equipment:
Hand beater with blades
Large glass bowl
Rubber spatula
2 gallon-size ziplock bags
Food dryer with deep trays (110 degrees F capable)
One or more of the following:
Food to dry mallowmallow on
Silicone nonstick baking mats
Parchment paper
Directions:
Directions here have been divided into six sections to give you an idea of the considerations you should keep in mind when making mallowmallows. Read the whole thing before you begin so you can plan ahead for success:
Whipping the mallowmallow
Using a mallowmallow dispenser
Using a food dryer
Drying mallowmallows on selected foods
Drying mallowmallows on a surface
Powdering the mallowmallows
1. Whipping the mallowmallow
Follow the directions for “Mallow Meringue,” only now include the mallowmallow ingredients (includes extra sugar and maple extract). Continue whipping until the foam is stiff and offers a bit of resistance. You’ll see the foam building up on the beater blades. It will be tougher to move the beater blades around through the foam once you whip it thick enough.
2. Using a mallowmallow dispenser
Use a rubber spatula to scoop up the foam. Pack it into a standard gallon-sized ziplock bag. Remind yourself that the mallow whites will separate if the foam is left out too long. Set up ahead of time so you can do things rapid fire—as soon as the foam gets into the dispenser bag.
Once all the foam is in the bag, get as much air out as you can before sealing the zipper. Once sealed, cut a 3/8-inch piece off one of the lower corners of the bag. You now have a dispensing bag for forming the mallowmallows—just squeeze the foam out the hole.
Try squeezing out about half the thickness of a commercial marshmallow on whatever surface you form them on. If you are putting them on some other food for drying, spread them out in a layer covering that food. If you are putting them directly on a drying surface, give each dollop some space so that if you have to bend the surface to pry the mallowmallow free, the adjacent mallows will not be touched. Touching mallowmallows will permanently glue them to each other. With practice, you can make mallowmallows in the shape of large Hershey’s Kisses.
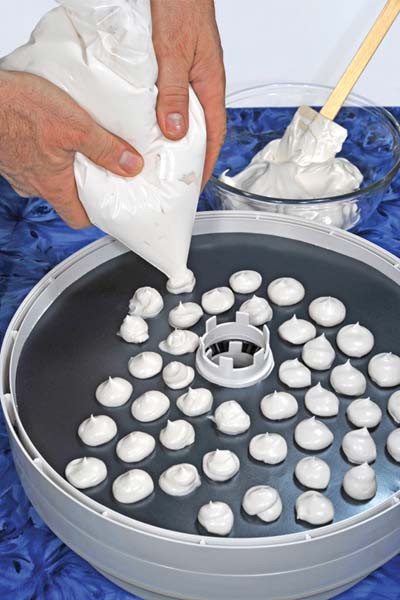
Dispensing mallowmallow onto a silicone mat within a food dryer tray.
3. Using a food dryer
A food dryer is necessary to transform the mallow foam to mallowmallows. Your goal is to get them to an optimal moisture content—not too moist, not too dry.
DO NOT use an oven to do your drying. Heating the mallow foam somewhere above 118 degrees F will begin to cook it, revealing a mild vegetable flavor. If you can set your oven to 110 degrees F and insert a fan to move the air without risking fire, melting plastic, or electrocution, then go ahead and try an oven.
The most popular food dryer I’ve seen is the round plastic kind with stackable layers. The American Harvester is a common brand that I use. You can buy them new for about $40 or find them cheap at yard sales.
4. Drying mallowmallows on selected foods
A general reality of drying mallowmallows over a several-hour process is that a small portion of the mallow whites re-liquefy and sink to the base of each drying piece. If the whites sink to a solid surface, the mallow sticks to that surface over most of the drying process. So the most practical drying surface is food. For instance, if you are going to make s’mores, then dry them right on chocolate resting on graham cracker squares. That way, by the end of the drying process, you have a finished product ready to eat. Mmmm . . .
If you are drying them on food, remove them from the dryer after 3 hours. This assures a softer, more delicate product. Eat them fresh for maximum enjoyment. Somewhere between three and five hours of drying, the mallowmallows go from soft and delicate to chewier to dry and crunchy.
5. Drying mallowmallows on a surface
If you want to make mallowmallows that stand alone and can be eaten and used like regular marshmallows, you have the following considerations within a 3- to 4-hour drying time: 3 hours provide superior quality, but the mallowmallows are difficult to pry from the drying surface; 4 hours make a chewier to crunchier quality, with easier removal from the drying surface.
I have tried every conventional and unconventional surface upon which to dry the mallowmallows—most failed because I could not pry the dried mallowmallows free without destroying them. The best surface I’ve found are the silicon-based baking mats. These begin to work only when the drying time is extended to somewhere between 3-1/2 and 4 hours at 110 degrees F. After that time, the mallowmallow becomes dry enough at its base to begin separating from the mat. These mallowmallows are soft, spongy, and chewy.
Remember that the size of the mallowmallow you are making and the surface area that the base of that mallowmallow takes up will affect the drying time of your finished product. Other considerations are the accuracy of your food dryer’s thermostat (check it with a thermometer), how many trays you have stacked in it, how close to the center of the tray (where the air is circulating) the mallow is, and how close the tray is to the top or the bottom of the food dryer (bottom is hotter). These are all things that may affect your final result.
Sorry if your head is spinning at this point. This is not graduate-level biochemistry. I am just trying to alert you to some things to think about if you are having trouble getting that “perfect” mallowmallow.
6. Powdering the mallowmallows
Most people who have tried these confections cannot wait to get their hands on them right out of the dryer. And this is when mallowmallows are at their best. You can pick them up and eat them without any problem and with great enjoyment.
If, however, you are planning on storing them like regular marshmallow to be eaten later, you have a problem. While they are dry enough not to stick to your fingers, they are still tacky enough to stick to each other. This can become a big gloppy mess unless you do not mind eating one big 30-piece mallowmallow.
To prevent them from sticking to each other, you have to “powder” them. That is, as you pluck them from the dryer, drop them into a bag filled with the following: 1/4 cup powdered sugar mixed thoroughly in 3/4 cup cornstarch. After you drop some mallowmallows in, close the bag and shake it about. Spoon them out onto a strainer, shake the strainer to remove the excess powder, and your mallowmallows are now ready for bagging. They are best when eaten instantly and are still great within 24 hours. They will be too dried out after 3 days in the bag to be recognized as mallowmallows—still edible and flavorful, but with a texture like Styrofoam.
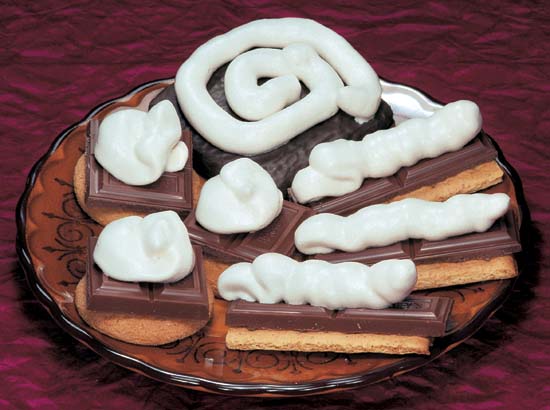
Mallowmallow S’mores. Take graham crackers or vanilla wafers, cover with chocolate bar pieces, spread with fresh mallowmallow fluff, and eat them as is. Or put it all in a food dryer at 110 degrees F for about 3 hours to give them the consistency of marshmallows, and you have ready-made s’mores. Or use fudge grahams and skip the chocolate bars (see largest s’more at the back of the plate above).
Follow-Up Notes
Most people will not believe you can do this until they are eating s’mores that you made in front of them. Do it—they’ll never look at wild foods in the same way again.
It may take you a few tries to get this perfect because you will be adjusting to your own kitchen, its equipment, and your own way of interpreting my directions. Enjoy your kitchen time—you’ll get it right, perhaps even the first time.
From a social perspective, this is a wonderful activity to keep children occupied for four or five hours. They have fun, get a little closer to nature, spend some time with you, and have s’mores to look forward to at the end of the day. What a wonderful time it could be.
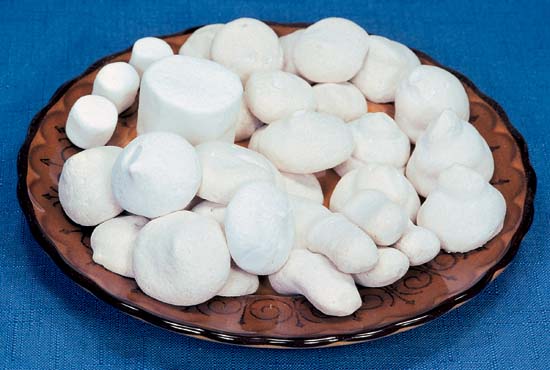
Mallowmallows. Make these into whatever shape you want. Tall narrow ones dry more quickly and are easier to remove from drying surfaces. There are four store-bought marshmallows on this plate for color and shape comparisons.